I'm so far behind on posting recipes here.
I've been doing a lot of cooking lately, much of it with my fresh veggies from the CSA farm.
This dish was my first time using bok choy. It was adapted from a recipe included in our weekly farm newsletter. The recipe was for a cold noodle salad, but I used it to make a hot pad Thai-type dish.
THAI PEANUT NOODLES WITH BOK CHOY
8 oz Pad Thai noodles
1 head/bunch of bok choy
1 bell pepper, thinly sliced
2 medium carrots chopped
4-5 green onions sliced
1/2 cup chopped cashews
For the sauce:
1/2 cup peanut butter
1 lime, juiced and zested
2 teaspoons sesame oil
1 tablespoon seasoned rice wine vinegar
2 tablespoon soy sauce
3 tablespoons honey or molasses
2 cloves garlic, roughly chopped
1/2 cup roughly chopped cilantro (stems and all)
2-3 teaspoons curry powder
2-4 T water
Soak noodles as directed on the package.
In the meantime, chop up the veggies and make the sauce.
For the sauce: Put the ingredients in the blender and blend, or, just mix by hand. (Use warm water to help soften the peanut butter.)
In a large wok, stir fry the bok choy. Add the other vegetables. When the noodles are done soaking, add them to the wok. Pour the sauce into the mix and stir fry everything until the noodles are soft.
Showing posts with label gluten-free. Show all posts
Showing posts with label gluten-free. Show all posts
Sunday, July 15, 2012

Tuesday, June 19, 2012
Rhubarb Cake

The original recipe that inspired this cake was actually a recipe for a strawberry cake, but when I saw the picture on Pinterest, I assumed it was rhubarb.
The strawberry version, I'm sure, is delicious, but I decided to try it with rhubarb since I've got lots of that growing in my garden.
My recipe looked something like this:
RHUBARB CAKE
1 cup (2 sticks) butter, softened
2 1/4 cups sugar, divided
3 eggs
3 tablespoon lemon juice, divided
Zest of 1 lemon
2 1/4 cups gluten-free flour (I used a flour mixture from Williams-Sonoma)
1/2 teaspoon baking soda
1/2 teaspoon xanthan gum
1/2 teaspoon salt
8 oz. plain yogurt
About 2 cups rhubarb, diced
1 cup powdered sugar
Preheat oven to 325. Grease and flour a 10 inch Bundt pan.
Sift together the flour, baking soda and salt. Mix in the lemon zest and set aside.
With an electric mixer, cream together the butter and 2 cups sugar until light and fluffy. Beat in the eggs one at a time, then stir in 1 tablespoon lemon juice.
Alternate beating in the flour mixture and the yogurt, mixing just until incorporated.
Toss the rhubarb with the remaining 1/2 cup of sugar. Gently mix into the batter.
Pour the batter into the Bundt pan. Bake in the preheated oven for 60 minutes, or until a toothpick inserted into the center of the cake comes out clean.
Allow to cool at least 20 minutes in the pan, then turn out onto a wire rack and cool completely. Once cooled whisk together the remaining 2 tablespoons of lemon juice and the powdered sugar. Drizzle over the top of the cake.
Saturday, June 9, 2012
Cauliflower pizza

A friend at work gave me this recipe. She said it was a great way to make an easy, gluten-free pizza crust.
I was a little skeptical when she said the crust was made from cauliflower, but it really is a good recipe. Not only does the crust contain cauliflower, but there's also cheese baked into it, which makes it gooey and delicious. I was worried about the crust holding together, put it really does -- maybe not enough to pick up a slice of pizza and eat it, but it worked just fine with a fork and knife.
I highly recommend this one:
CAULIFLOWER PIZZA CRUST
1 cup cooked, riced cauliflower (directions below)
1 cup shredded mozzarella cheese
1 egg, beaten
1 tsp dried oregano
1/2 tsp crushed garlic
1/2 tsp garlic salt
To "Rice" the Cauliflower:
Take 1 large head of fresh cauliflower, remove stems and leaves, and chop the florets into chunks. Place in food processor and pulse until it looks like grain.
Place the riced cauliflower into a microwave safe bowl and microwave for 8 minutes.
(One large head should produce approximately 3 cups of riced cauliflower. The remainder can be used to make additional pizza crusts immediately, or can be stored in the refrigerator for up to one week. I chopped up my left-over cauliflower and roasted it in the oven with some olive oil and garlic. Yum!)
To Make the Pizza Crust:
Preheat oven to 450 degrees. Spray a cookie sheet with non-stick cooking spray.

In a medium bowl, stir together 1 cup cauliflower, egg and mozzarella. Add oregano, crushed garlic and garlic salt, stir.
Transfer to the cookie sheet, and using your hands, pat out into a 9" round.
Bake at 450 degrees for 15 minutes.

Remove from oven. To the crust, add sauce, toppings and cheese. Place under a broiler at high heat just until cheese is melted (approximately 3-4 minutes).
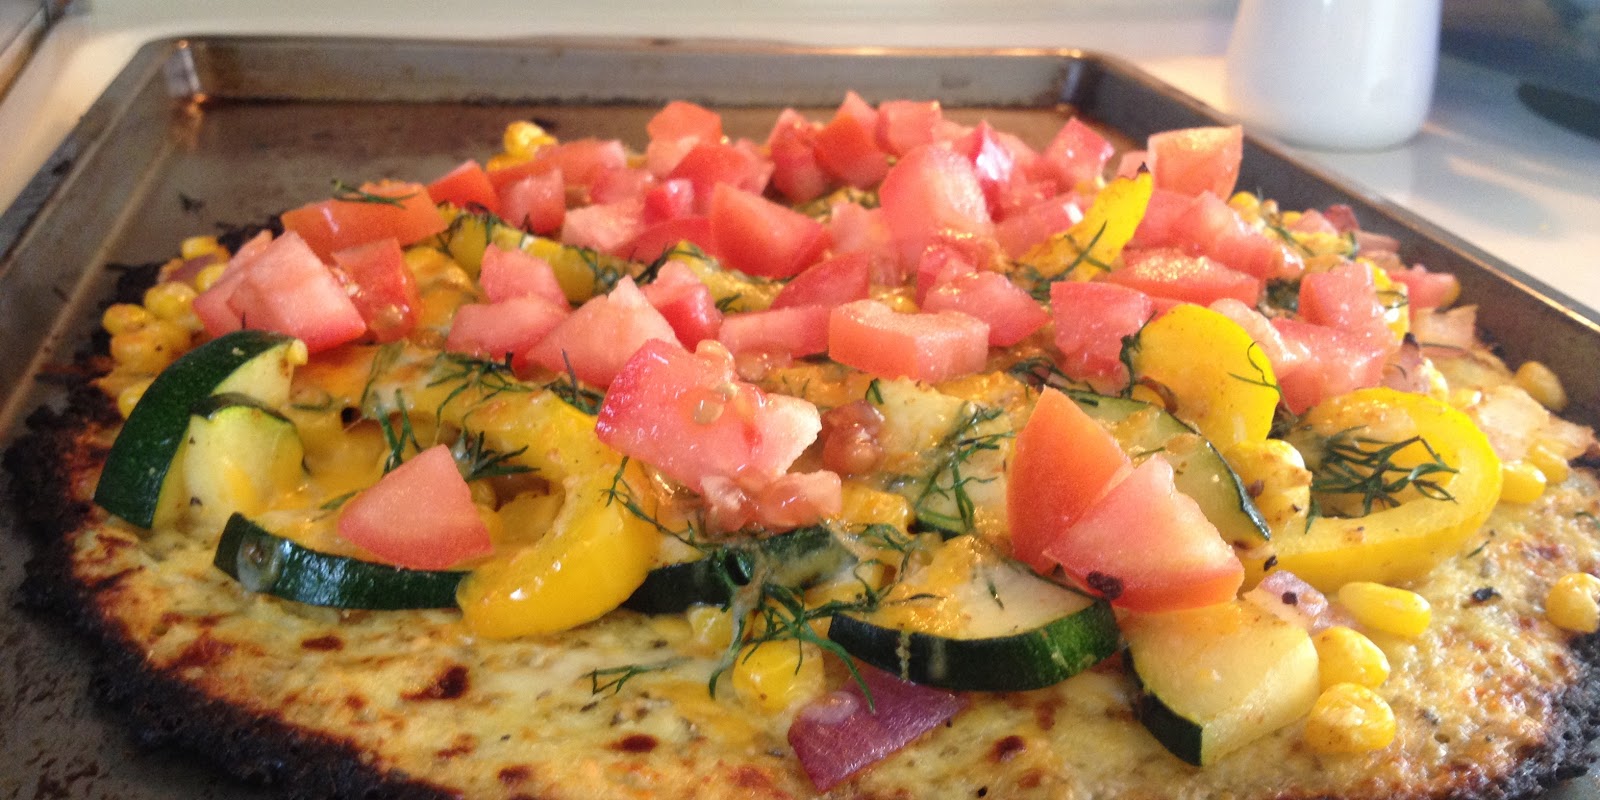
The inspiration for my toppings came from something I found on Pinterest. I skipped the poblano pepper, and instead sauteed zucchini, corn, garlic and red onion. (I didn't add the milk or egg or anything). I also added some sliced yellow pepper and topped it all with fresh dill and cheddar cheese. After the pie came out of the oven, I added some chopped tomatoes. Good stuff!
Homemade spaghetti sauce

A couple weeks ago I wrote a story about how much sodium we, as Americans, eat.
I try very hard to eat a healthy diet. Part of that is limiting how much packaged food I eat. Because I don't eat gluten, a lot of packaged food is out anyway. But as I was reporting my sodium story, I realized one spot I could probably cut back on my salt in take is canned spaghetti sauce. It's not like I eat it every day, but I usually have a jar or two in the pantry because it makes a quick easy meal.
I was telling my mom about all this, and she suggested making a batch of this recipe from Cooking Light. It makes a bunch of marinara sauce, which I then froze in smaller quantities -- pretty much like having a jar of sauce in the cupboard.

BASIC MARINARA SAUCE
3 tablespoons olive oil
3 cups chopped yellow onion (about 3 medium)
1 tablespoon sugar
3 tablespoons minced garlic (about 6 cloves)
2 teaspoons salt
2 teaspoons dried basil
1 1/2 teaspoons dried oregano
1 teaspoon dried thyme
1 teaspoon freshly ground black pepper
2 tablespoons balsamic vinegar
2 cups fat-free, less-sodium chicken broth
3 (28-ounce) cans no-salt-added crushed tomatoes (I couldn't find crushed, so I used diced and one can of sauce)
Heat oil in a large pot oven over medium heat. Add onion; cook 4 minutes, stirring frequently. Add sugar and next 6 ingredients (through black pepper); cook 1 minute, stirring constantly.
Stir in vinegar; cook 30 seconds. Add broth and tomatoes; bring to a simmer. Cook over low heat for 55 minutes or until sauce thickens, stirring occasionally.
Friday, June 8, 2012
Cheesecake bars

I made these cheesecake bars one time last summer and decided to make them again recently for a friends birthday.
The recipe, from Cooking Light, calls for fresh cherries, which are used to make what is basically a jam. I decided to skip that step and just buy some jam instead. Last time I used blackberry jam, but this time I found cherry jam and used that instead. Here's the original Cooking Light recipe, and here's my version:
CHEESECAKE BARS
4 1/2 ounces gluten-free flour mixture (about 1 cup. I used sorghum, brown rice and tapioca)
3 tablespoons powdered sugar
1/8 teaspoon salt
5 tablespoons chilled butter, cut into small pieces
3 1/2 teaspoons ice water
3/4 cup (6 ounces) 1/3-less-fat cream cheese
1/3 cup fat-free plain Greek yogurt
1/3 cup granulated sugar
1/2 teaspoon vanilla extract
1 large egg
Cherry or other flavored jam (about one small jar, depending on how much you like)
Cherry or other flavored jam (about one small jar, depending on how much you like)
Line an 8-inch square glass or ceramic baking dish with parchment paper. (I use a small rectangular glass pan).
Place flour, powdered sugar, and salt in a food processor; pulse 2 times to combine. Add chilled butter, and drizzle with ice water. Pulse 10 times or until mixture resembles coarse meal. Pour the mixture into prepared baking dish (mixture will be crumbly). Press mixture into bottom of dish.
Bake at 350° for 23 minutes or until lightly browned. Cool completely. Reduce oven temperature to 325°.
Place cream cheese and remaining ingredients in food processor; process until smooth.
Spoon cream cheese mixture over cooled crust; spread evenly. Dollop cherry mixture over cream cheese mixture, and swirl together with a knife.
Bake at 325° for 36 minutes or until set. Cool on a wire rack. Cover and chill at least 3 hours.
Theses are good bars. My only problem with them is that I can't get them to turn out too pretty. I don't like to serve them in the pan because of the parchment paper, but I think they look kind of messy all cut up on a plate. (That's why there's no picture). Oh well, at least they taste good.
Sunday, June 3, 2012
Wedding shower tea party: Chicken salad cups

My Aunt Barb found this Cooking Light recipe for chicken salad. (We're a Cooking Light family). We made a few tweaks and ours looked something like this:
CREAMY CHICKEN SALAD
1/2 cup light mayonnaise
1/2 cup plain fat-free Greek yogurt
1 tablespoon fresh lemon juice
1 tablespoon white wine vinegar
1 tablespoon Dijon mustard
1 teaspoon honey
1/2 teaspoon kosher salt
1/2 teaspoon freshly ground black pepper
1/3 cup chopped celery
1/3 cup red grapes, halved
7 tablespoons (about 2 ounces) coarsely chopped almonds
One head butter leaf lettuce

Poach the chicken in a dutch oven or large frying pan. Once cooked through, allow chicken to cool completely.


Wedding shower tea party: fruit salad
 |
Cooking Light photo
Doesn't that look good? |
I found this recipe on Pinterest also. It had some kind of funky ingredients for a fruit salad (basil and olive oil), but the photo just looked so good. Plus, it was a Cooking Light recipe, and Cooking Light never leads me astray.
PEACH, STRAWBERRY AND BASIL SALAD
1 cup fresh orange juice
1 1/2 tablespoons sugar
1 1/2 tablespoons champagne vinegar or white wine vinegar
1 tablespoon extra-virgin olive oil
Dash of salt
1 package fresh blueberries
1 pound fresh strawberries, halved
4 large ripe peaches or nectarines, cut into wedges
1/4 cup small fresh basil leaves, chopped

Combine the first 3 ingredients in a small saucepan; bring to a boil. Cook, uncovered, until reduced to 1/2 cup (about 25 minutes). Add oil and salt to pan, stirring with a whisk. Let stand 2 minutes.
Combine berries and peach in a large bowl. Add juice mixture, stirring gently. Sprinkle with basil.
Monday, April 16, 2012
A unique blend of flavors
This recipe was a recommendation from my mom. She found it in Sunset magazine and said I had to try it.
I cooked it up for dinner last night, and my mom was right. It is delicious. I really like the unique flavor blend of the orange zest and the spicy cayenne pepper. It's a unique dish and I definitely recommend it.

Chicken, Quinoa and Olive Stew
4 cups water
2 chicken breasts
2 tablespoons extra-virgin olive oil
1 large yellow onion, chopped
1/2 teaspoon salt
1 teaspoon ground cumin
1 teaspoon ground coriander
1 teaspoon dried oregano
3 garlic cloves, minced
1/2 teaspoon ancho chile powder
1/2 teaspoon cayenne
1 can fire-roasted diced tomatoes
2 teaspoons orange zest
1/2 cup quinoa
1 cup cooked chickpeas (garbanzos), rinsed if canned
1 cup black olives (the recipe calls for pimiento-stuffed small green olives, but I'm just not a fan of those).
Bring water to a simmer in a large, heavy-bottomed pot over medium-high heat. Add chicken and lower heat to a simmer. Cook chicken, covered, 15 to 20 minutes, or until cooked through; transfer to a plate. Pour broth into a large bowl and set aside. Wipe out pot.

Add oil, onion, and salt to pot and cook over medium heat until onion softens and is starting to brown, about 10 minutes.
Stir in cumin, coriander, oregano, and garlic; cook 2 minutes. Add ancho chile powder, cayenne, tomatoes, reserved broth, orange zest, and quinoa. Reduce heat and simmer, covered, until a white ring appears around each quinoa seed, 10 to 15 minutes. Meanwhile, shred chicken.
Add shredded chicken, chickpeas and olives and heat through.

I cooked it up for dinner last night, and my mom was right. It is delicious. I really like the unique flavor blend of the orange zest and the spicy cayenne pepper. It's a unique dish and I definitely recommend it.

Chicken, Quinoa and Olive Stew
4 cups water
2 chicken breasts
2 tablespoons extra-virgin olive oil
1 large yellow onion, chopped
1/2 teaspoon salt
1 teaspoon ground cumin
1 teaspoon ground coriander
1 teaspoon dried oregano
3 garlic cloves, minced
1/2 teaspoon ancho chile powder
1/2 teaspoon cayenne
1 can fire-roasted diced tomatoes
2 teaspoons orange zest
1/2 cup quinoa
1 cup cooked chickpeas (garbanzos), rinsed if canned
1 cup black olives (the recipe calls for pimiento-stuffed small green olives, but I'm just not a fan of those).
Bring water to a simmer in a large, heavy-bottomed pot over medium-high heat. Add chicken and lower heat to a simmer. Cook chicken, covered, 15 to 20 minutes, or until cooked through; transfer to a plate. Pour broth into a large bowl and set aside. Wipe out pot.

Add oil, onion, and salt to pot and cook over medium heat until onion softens and is starting to brown, about 10 minutes.
Stir in cumin, coriander, oregano, and garlic; cook 2 minutes. Add ancho chile powder, cayenne, tomatoes, reserved broth, orange zest, and quinoa. Reduce heat and simmer, covered, until a white ring appears around each quinoa seed, 10 to 15 minutes. Meanwhile, shred chicken.
Add shredded chicken, chickpeas and olives and heat through.

Saturday, April 7, 2012
Blondies
This recipe is one of the first treats my mom made and sent me after I went gluten free, and it's still one of my favorites.
These bars are gooey with a good flavor (and super easy to make).
My mom found the original recipe on celiac.com. Here's my version:

GLUTEN-FREE BLONDIES
1/2 cup butter
2 cups packed brown sugar
3 eggs
1 teaspoon vanilla
1 1/2 cups gluten-free flour (I used a mix of sorghum, rice and tapioca)
3/4 teaspoon xanthan gum
2 teaspoons baking powder
1/2 teaspoon salt
2 cups of some combination of chopped dates, chopped nuts, chocolate chips, butterscotch chips or white chocolate chips (I used 1 cup each of dates and white chips)
Preheat over to 350.
Cream margarine and brown sugar together. Add eggs and vanilla and beat until light.
Combine flour, xanthan gum, baking powder and salt. Mix well.
Add the flour mixture to the egg/butter/sugar mixture and blend at low speed.
Stir in dates/nuts/chips.
Spread batter into a greased 9-by-13-inch pan.
Bake for 25 to 30 minutes. Cool before cutting into bars.
These bars are gooey with a good flavor (and super easy to make).
My mom found the original recipe on celiac.com. Here's my version:

GLUTEN-FREE BLONDIES
1/2 cup butter
2 cups packed brown sugar
3 eggs
1 teaspoon vanilla
1 1/2 cups gluten-free flour (I used a mix of sorghum, rice and tapioca)
3/4 teaspoon xanthan gum
2 teaspoons baking powder
1/2 teaspoon salt
2 cups of some combination of chopped dates, chopped nuts, chocolate chips, butterscotch chips or white chocolate chips (I used 1 cup each of dates and white chips)
Preheat over to 350.
Cream margarine and brown sugar together. Add eggs and vanilla and beat until light.
Combine flour, xanthan gum, baking powder and salt. Mix well.
Add the flour mixture to the egg/butter/sugar mixture and blend at low speed.
Stir in dates/nuts/chips.
Spread batter into a greased 9-by-13-inch pan.
Bake for 25 to 30 minutes. Cool before cutting into bars.
Sunday, April 1, 2012
Gluten-free granola
Gluten-free cereal is really expensive. I have a rule that I'll only buy it on sale. Usually I can find it marked-down often enough, that I nearly always have a box around. But lately there have been no sales to be found, so I've been going without cereal.
That's why today I decided to try making my own granola. I used a recipe from Cooking Light that I had made once before for Christmas gifts, but this time I made some pretty substantial changes to it.

CHERRY ALMOND GRANOLA
2 cups millet
1 cup buckwheat groats
1/2 cup ground flaxseed

Combine the first six ingredients (millet through cinnamon) in a large bowl.
In a sauce pan, combine juice, honey, and brown sugar. Heat over medium heat until sugar dissolves, stirring frequently. Remove from heat; stir in oil and almond extract.
Pour the honey mixture over the grain mixture, stirring to coat.

Spread the mixture in a thin layer onto a jelly-roll pan coated with cooking spray. Bake at 300° for 10 minutes; stir well. Bake another 15 minutes and stir. Repeat this process until the granola turns golden brown. (This may take a while. I got impatient and turned up the oven, which resulted in burnt granola).
Allow granola to cool, then break it into chunks and place in a bowl. Add cherries and mix.

Even though, I burned my granola, I think it's super tasty. This recipe is definitely a keeper, although I'm not sure it's any less expensive than buying full-priced cereal.
That's why today I decided to try making my own granola. I used a recipe from Cooking Light that I had made once before for Christmas gifts, but this time I made some pretty substantial changes to it.
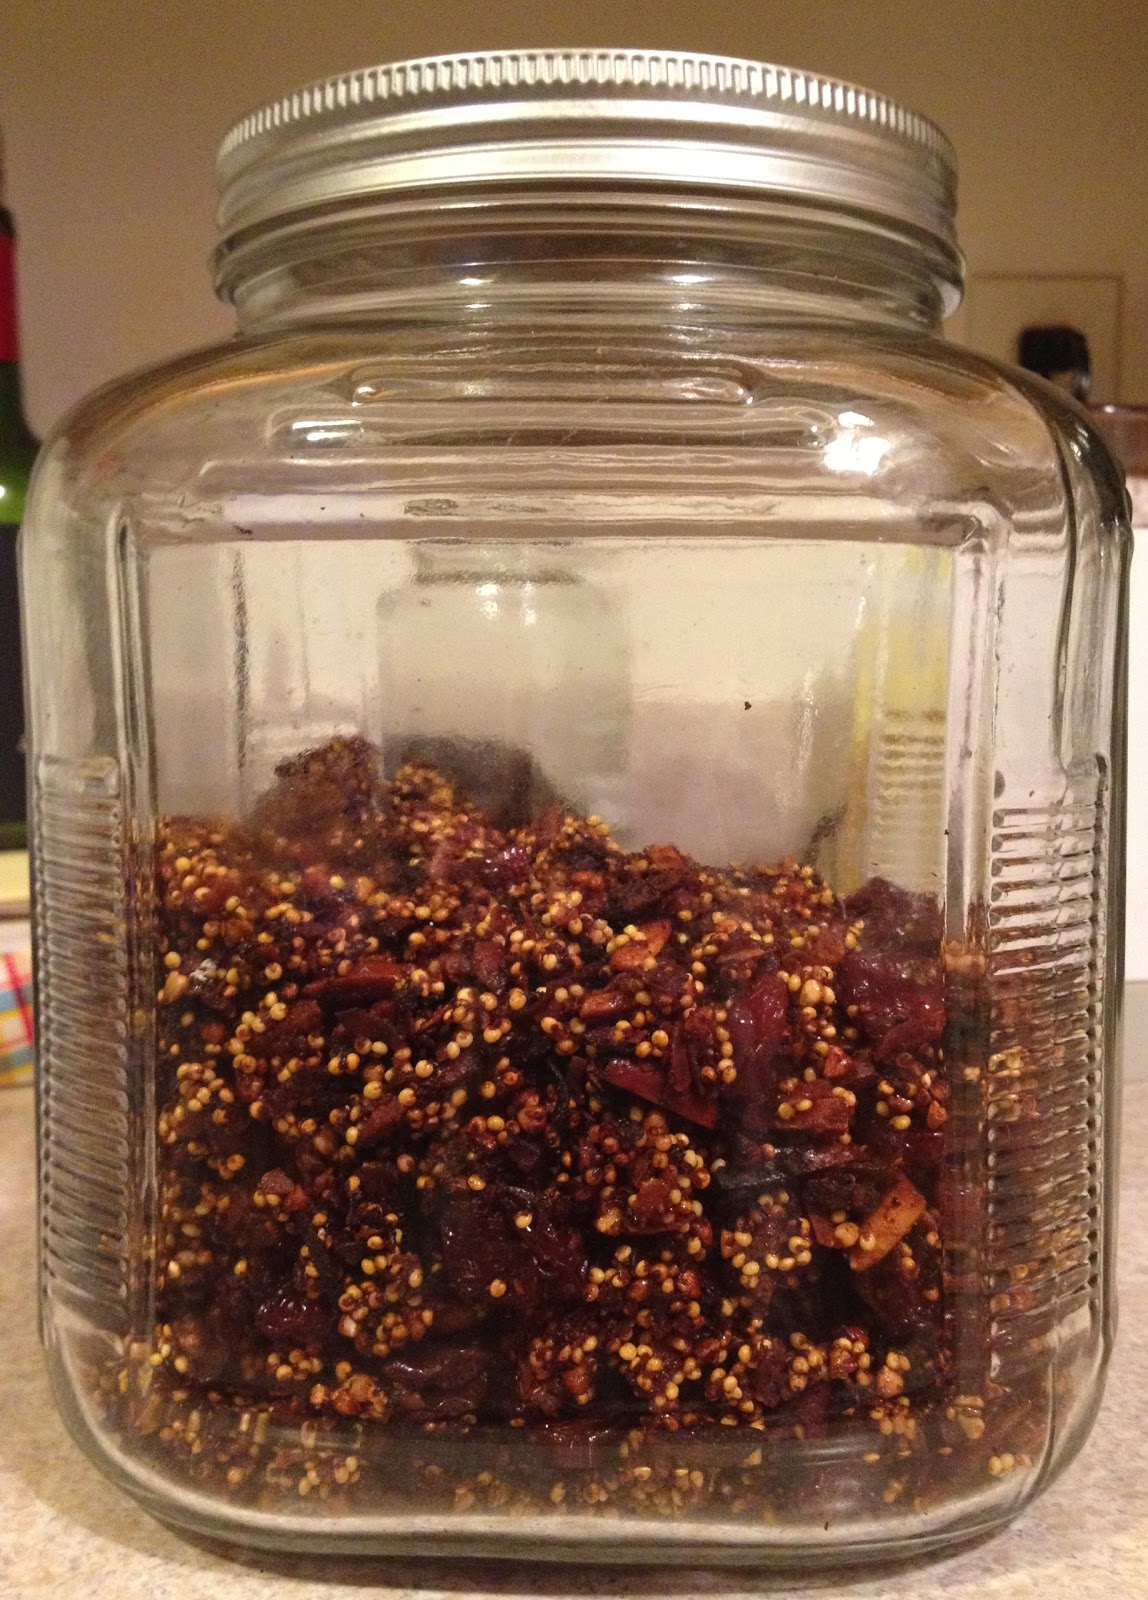
CHERRY ALMOND GRANOLA
2 cups millet
1 cup buckwheat groats
1/2 cup ground flaxseed
1/2 cup chopped slivered almonds
1 cup coconut
1 tablespoon ground cinnamon
1/2 cup pomegranate-cranberry juice (that's what I had in the fridge. The recipe calls for orange juice)
1/3 cup honey
1/4 cup packed brown sugar
2 teaspoons canola oil
1 teaspoon almond extract
1 cup dried cherries
Preheat oven to 300.
Combine the first six ingredients (millet through cinnamon) in a large bowl.
In a sauce pan, combine juice, honey, and brown sugar. Heat over medium heat until sugar dissolves, stirring frequently. Remove from heat; stir in oil and almond extract.
Pour the honey mixture over the grain mixture, stirring to coat.

Spread the mixture in a thin layer onto a jelly-roll pan coated with cooking spray. Bake at 300° for 10 minutes; stir well. Bake another 15 minutes and stir. Repeat this process until the granola turns golden brown. (This may take a while. I got impatient and turned up the oven, which resulted in burnt granola).
Allow granola to cool, then break it into chunks and place in a bowl. Add cherries and mix.

Even though, I burned my granola, I think it's super tasty. This recipe is definitely a keeper, although I'm not sure it's any less expensive than buying full-priced cereal.
Saturday, March 24, 2012
An old favorite

My mom and I did a lot of baking last week when I was in Colorado -- so much that we had to kick ourselves out of the kitchen after we realized we made more cookies than we could ever possibly eat.
But before we put the kibosh on baking, we whipped up a batch of an old favorite -- molasses crinkles.
I think this was the first time we made them gluten free, and they turned out perfectly chewy.
Here's the recipe:

MOLASSES CRINKLES
Mix thoroughly in a bowl:
3/4 cup shortening
1 cup brown sugar
1 egg
1/4 cup molasses
In another bowl, mix:
2 1/4 cups flour (we used a mixture of sorghum, rice and tapioca)
2 teaspoons soda
1 teaspoon cinnamon
1 teaspoon ginger
1/2 teaspoon cloves
1/4 teaspoon salt
Mix the dry ingredients into the shortening mixture.
Chill dough in refrigerator at least two hours or overnight.
 |
| I used spring colored sugar |
Roll dough into balls and dip tops into sugar.
Bake on greased cookie sheet at 375 for 10 minutes.
Sunday, March 18, 2012
Macaroons!
Macaroons were on our list of Christmas cookies to make this year, but we didn't get to them. So my mom and I decided to try them while I was home.
After a day of baking, we took a plate of goodies over to a family friend.
"Macaroons!" she exclaimed with delight we she saw what we brought. "I love macaroons but I never make them because they're so hard to make."
I've never made macaroons before, so maybe they usually are hard, but this recipe from Epicurious was pretty darn easy. Here it is:

AMBROSIA MACAROONS
1/2 cup (1 stick) unsalted butter, room temperature (we used dairy-free margarine)

After a day of baking, we took a plate of goodies over to a family friend.
"Macaroons!" she exclaimed with delight we she saw what we brought. "I love macaroons but I never make them because they're so hard to make."
I've never made macaroons before, so maybe they usually are hard, but this recipe from Epicurious was pretty darn easy. Here it is:

AMBROSIA MACAROONS
1/2 cup (1 stick) unsalted butter, room temperature (we used dairy-free margarine)
3/4 cup sugar
1/8 teaspoon salt
2 teaspoons finely grated orange peel
3 large eggs
28 ounces sweetened flaked coconut (about 6 cups firmly
packed)
6 ounces bittersweet chocolate, melted
(with about 4 tablespoons of margarine added while melting)
Preheat to 325°F. Line 3
large rimmed baking sheets with parchment paper or baking mats.
Using electric mixer, beat butter in
large bowl until smooth. Add sugar and salt; beat until blended. Beat in orange
peel, then eggs, one at a time. Mix in coconut.
Drop batter onto sheets by
tablespoonfuls, spacing 1 1/2 inches apart.

Bake macaroons, 1 sheet at a time, until golden on bottom
and browned in spots, 25 to 30 minutes. Cool completely on sheets.
Using fork, drizzle chocolate over macaroons. Chill on
sheets until chocolate is firm, about 30 minutes.
Thursday, March 15, 2012
Lemony goodness
My mom and I have been baking up a storm since I got to Colorado.
While looking through her recipe box for molasses crinkle cookies (I'll post that recipe soon), we found a recipe for lemon curd squares, given to my mom by an old friend. My mom had never made the dessert, so we decided to give it a try. It's definitely a new favorite.

LEMON CURD SQUARES
1 cup flour (we used a gluten-free mixture of sorghum, potato starch and white rice flour)
1/4 cup powdered sugar
1/2 cup butter, melted
1 cup sugar
1/2 teaspoon baking powder
2 eggs, slightly beaten
2 tablespoons lemon juice
2 teaspoons lemon zest
Preheat oven to 350.
Sift together flour and powdered sugar. Add melted butter.
Press the mixture into a greased 8-by-8-inch pan.
Bake for 20 minutes.

Meanwhile, combine sugar, baking powder, eggs, lemon juice and lemon zest.
Pour over crust. (No need to let the crust cool).
Bake for 25 minutes.
While looking through her recipe box for molasses crinkle cookies (I'll post that recipe soon), we found a recipe for lemon curd squares, given to my mom by an old friend. My mom had never made the dessert, so we decided to give it a try. It's definitely a new favorite.

LEMON CURD SQUARES
1 cup flour (we used a gluten-free mixture of sorghum, potato starch and white rice flour)
1/4 cup powdered sugar
1/2 cup butter, melted
1 cup sugar
1/2 teaspoon baking powder
2 eggs, slightly beaten
2 tablespoons lemon juice
2 teaspoons lemon zest
Preheat oven to 350.
Sift together flour and powdered sugar. Add melted butter.
Press the mixture into a greased 8-by-8-inch pan.
Bake for 20 minutes.

Meanwhile, combine sugar, baking powder, eggs, lemon juice and lemon zest.
Pour over crust. (No need to let the crust cool).
Bake for 25 minutes.
Tuesday, March 13, 2012
Christmas cookie recap
Back in Colorado this week for a visit with my family, I thought this was an appropriate, if out-of-season, time to review the Christmas baking I did this year with my mom.
Every year at Christmas, my mom (from whom I inherited my love of baking) and I spend days in the kitchen making Christmas cookies.
We have a few favorites that we make year after year, but a big part of the baking fun is trying new recipes.
Here are a few of cookies baked this year:
These are definitely a new favorite, although I only got to sample a couple before the rest disappeared. I made these cookies again to take to work and one of my co-workers said they were the best cookies he's every tasted. Talk about high praise!
I don't know if I'd go as far as to say best ever, but I definitely loved them. Here's the original recipe from Epicurious, and our version:
VANILLA-CHERRY CHOCOLATE CHIP COOKIES
1 1/2 cups all-purpose flour (We used mixture of sorghum, rice and tapioca flour and corn starch)
I love thumbprint cookies -- the combination of a crunchy cookie and gooey jam filling, plus I think they look nice on a plate of Christmas cookies.
This cookie ended up with crumbly texture, similar to shortbread, hence the name I gave them. They're different than other thumbprint cookies I've had, but I thought they were pretty good.
Here's the original recipe from Epicurious. We pretty much stuck to it, with the exception of using a gluten-free flour mixture. For jam filling, we used huckleberry jam, and a cherry sauce that my mom found in her pantry. Both were delicious.
Ever since I went gluten-free, cut-out cookies have seemed pretty daunting (along with layer cakes, yeast breads and anything rolled, folded or stacked).
I love baking, decorating and eating frosted cookies, but the past few years, I've kept them off the Christmas menu.
This year, one of my goals was to try gluten-free cut-out cookies. My mom did some research and found a great recipe on about.com.
I'll admit I had a near breakdown while trying to roll these out, but once a switched to a better mat and got more flour on my rolling pin, it was smooth sailing. The best part was decorating them with my mom and sister, sipping eggnog and watching "The Help."
GLUTEN-FREE SUGAR COOKIES
1 1/2 cups amaranth flour
1/2 cup arrowroot starch (the recipe says cornstarch will also work)
1 cup powdered sugar
1 teaspoon guar gum
1 teaspoon cream of tartar
pinch of sale
1 cup cold butter, cut in small pieces
1 egg
1 tablespoon milk (you may need a little more)
Preheat oven to 350.
Line baking sheets with parchment paper or baking mats.
Place all dry ingredients in a food processor and pulse until thoroughly blended.
Add butter and pulse about 10 times.
Add egg and 1 tablespoon milk. Pulse until the mixture forms a sticky, stiff dough. Add more milk if it's too dry. (Ours was actually a little too sticky, but the flour added while rolling it out brought it to the right consistency).
Wrap dough in waxed paper and refrigerate at least one hour.
I used a large, plastic rolling mat (I think it's Tupperware brand) to roll out the dough. Flour the mat and rolling pin with rice flour, or another type of gluten-free flour. Roll the dough to about the thickness of a pie crust.
I found that it helped to dip the cookie cutters in flour as well. Cut out cookies and place on prepared baking sheet.
Bake about 12 minutes or until the edges of the cookies turn golden-brown.
Cool completely before frosting.
Frosting:
Several cups powdered sugar
1 teaspoon almond or vanilla extract
4 tablespoons butter, softened
Milk (we used almond milk)
Place powdered sugar in a mixing bowl. Add extract, butter and about 3 tablespoons of milk. Mix. Add more milk in very small quantities (a little milk will go a long way) until the frosting reaches the right consistency. The frosting should be smooth but not runny.
Add food coloring as desired.
Frost cookies and decorate with sprinkles.
Every year at Christmas, my mom (from whom I inherited my love of baking) and I spend days in the kitchen making Christmas cookies.
We have a few favorites that we make year after year, but a big part of the baking fun is trying new recipes.
Here are a few of cookies baked this year:
 |
| Vanilla-cherry chocolate chip cookies |
These are definitely a new favorite, although I only got to sample a couple before the rest disappeared. I made these cookies again to take to work and one of my co-workers said they were the best cookies he's every tasted. Talk about high praise!
I don't know if I'd go as far as to say best ever, but I definitely loved them. Here's the original recipe from Epicurious, and our version:
VANILLA-CHERRY CHOCOLATE CHIP COOKIES
1 1/2 cups all-purpose flour (We used mixture of sorghum, rice and tapioca flour and corn starch)
1/2 teaspoon baking soda
1/2 teaspoon xantham gum
1/4 teaspoon coarse kosher salt
2 teaspoon vanilla extract
1 cup (6 ounces) dried cherries
8 tablespoons (1 stick) unsalted butter, room temperature
1/2 cup sugar
1/2 cup packed light brown sugar
1 large egg
1 cup semisweet chocolate chips
(the recipe calls for 1/2 cup each of chocolate chips and white chocolate chips. To accommodate my mom's lactose intolerance, we just went with a full cup of semisweet).
1/2 cup chopped hazelnuts
Preheat to 350°F. Line two large baking sheets with
nonstick baking mats or parchment paper.
In a large bowl, sift together the flour, baking soda, xantham gum and
salt.
In a small sauce pan, bring 1 cup water to a boil. Remove from heat and add the dried cherries and 1 teaspoon of vanilla extract. Let stand 5
minutes then drain.
In the bowl of a stand mixer fitted with the paddle
attachment, combine the butter, sugar, and brown sugar and beat on medium speed,
scraping the bowl occasionally, until light and fluffy, about 2 minutes. Add the
egg and 1 teaspoon vanilla extract and beat on medium until combined, about 1
minute.
With the mixer on low, add the flour mixture in 3 batches, stirring
until just combined. Add the cherries, chocolate chips and
hazelnuts and stir until just incorporated.
Drop the dough by heaping tablespoons onto the prepared
baking sheets, leaving about 2 inches between cookies. Bake until
light golden brown and just set, about 10 to 12 minutes. Cool the cookies on baking
sheets for 5 minutes before transferring to a wire rack to cool completely.
--------------------------
 |
| Shortbread thumbprint cookies |
This cookie ended up with crumbly texture, similar to shortbread, hence the name I gave them. They're different than other thumbprint cookies I've had, but I thought they were pretty good.
Here's the original recipe from Epicurious. We pretty much stuck to it, with the exception of using a gluten-free flour mixture. For jam filling, we used huckleberry jam, and a cherry sauce that my mom found in her pantry. Both were delicious.
----------------------------
 |
| Gluten-free sugar cookies |
Ever since I went gluten-free, cut-out cookies have seemed pretty daunting (along with layer cakes, yeast breads and anything rolled, folded or stacked).
I love baking, decorating and eating frosted cookies, but the past few years, I've kept them off the Christmas menu.
This year, one of my goals was to try gluten-free cut-out cookies. My mom did some research and found a great recipe on about.com.
I'll admit I had a near breakdown while trying to roll these out, but once a switched to a better mat and got more flour on my rolling pin, it was smooth sailing. The best part was decorating them with my mom and sister, sipping eggnog and watching "The Help."
GLUTEN-FREE SUGAR COOKIES
1 1/2 cups amaranth flour
1/2 cup arrowroot starch (the recipe says cornstarch will also work)
1 cup powdered sugar
1 teaspoon guar gum
1 teaspoon cream of tartar
pinch of sale
1 cup cold butter, cut in small pieces
1 egg
1 tablespoon milk (you may need a little more)
Preheat oven to 350.
Line baking sheets with parchment paper or baking mats.
Place all dry ingredients in a food processor and pulse until thoroughly blended.
Add butter and pulse about 10 times.
Add egg and 1 tablespoon milk. Pulse until the mixture forms a sticky, stiff dough. Add more milk if it's too dry. (Ours was actually a little too sticky, but the flour added while rolling it out brought it to the right consistency).
Wrap dough in waxed paper and refrigerate at least one hour.
I used a large, plastic rolling mat (I think it's Tupperware brand) to roll out the dough. Flour the mat and rolling pin with rice flour, or another type of gluten-free flour. Roll the dough to about the thickness of a pie crust.
I found that it helped to dip the cookie cutters in flour as well. Cut out cookies and place on prepared baking sheet.
Bake about 12 minutes or until the edges of the cookies turn golden-brown.
Cool completely before frosting.
Frosting:
Several cups powdered sugar
1 teaspoon almond or vanilla extract
4 tablespoons butter, softened
Milk (we used almond milk)
Place powdered sugar in a mixing bowl. Add extract, butter and about 3 tablespoons of milk. Mix. Add more milk in very small quantities (a little milk will go a long way) until the frosting reaches the right consistency. The frosting should be smooth but not runny.
Add food coloring as desired.
Frost cookies and decorate with sprinkles.
Monday, March 5, 2012
Mom's chocolate chip cookies (kind of)
My mom makes the world's best chocolate chip cookies. I might be somewhat biased on that, but the mom love baked into each bite is unbeatable.
This is her signature recipe, and it's perfect:
MOM'S CHOCOLATE CHIP COOKIES
Cream together:
1/2 cup shortening
1/2 cup margarine
1 cup brown sugar
1 cup white sugar
Add:
2 eggs
1 teaspoon vanilla
Add:
2 cups flour
1 teaspoon baking soda
1 teaspoon salt
1 cup oatmeal
1 cup chocolate chips
Grease a jelly roll pan. Spread batter into pan.
Bake in 350 degree oven for 15 minutes.
Let cool for 10-15 minutes (or however long you're patient). Cut into cookie bars.
These can also be made as drop cookies. Cook them 8-10 minutes.
Despite the perfection of this recipe, I can't resist but monkey with it each time I make it.
I hadn't made these cookies in probably a couple years, but decided they would be a good treat to take to a weekend ski get away.
The following recipe was my attempt to make the cookies healthier, and of course, gluten free. This wasn't, by a long shot, the best version I've ever made. The cookies came out with a cake-like texture and density -- none of the ooey-gooeyness of a chocolate chip cookie. I was pretty disappointed with them at first. I wasn't going to share this recipe, but once I got over them being nothing like my mom's cookies, I decided they were OK(ish).
My recommendation is to go with the original recipe, but just in case you're curious, here's the version I used.

NOT-AS-GOOD-AS-MOM'S CHOCOLATE CHIP COOKIES
Cream:
1/2 cup butter
1/2 cup apple sauce
1/2 cup brown sugar
1/2 cup white sugar
Add:
2 eggs
1 teaspoon vanilla
1 riped mashed banana
1/4 cup (roughly) peanut butter
Mix and add:
1 1/2 cups gluten-free flour (I used a combination of sorghum, brown rice and tapioca)
1/2 cup corn starch
1/2 teaspoon xantham gum
1 teaspoon baking soda
1/2 teaspoon salt
1 cup chocolate chips (a generous cup)
1 cup coconut (this is my substitute for oatmeal, since oatmeal contains gluten)
Grease a jelly roll pan. Spread batter into pan.
Bake in 350 degree oven for 15 minutes.
Let cool for 10-15 minutes (or however long you're patient). Cut into cookie bars.
This is her signature recipe, and it's perfect:
MOM'S CHOCOLATE CHIP COOKIES
Cream together:
1/2 cup shortening
1/2 cup margarine
1 cup brown sugar
1 cup white sugar
Add:
2 eggs
1 teaspoon vanilla
Add:
2 cups flour
1 teaspoon baking soda
1 teaspoon salt
1 cup oatmeal
1 cup chocolate chips
Grease a jelly roll pan. Spread batter into pan.
Bake in 350 degree oven for 15 minutes.
Let cool for 10-15 minutes (or however long you're patient). Cut into cookie bars.
These can also be made as drop cookies. Cook them 8-10 minutes.
Despite the perfection of this recipe, I can't resist but monkey with it each time I make it.
I hadn't made these cookies in probably a couple years, but decided they would be a good treat to take to a weekend ski get away.
The following recipe was my attempt to make the cookies healthier, and of course, gluten free. This wasn't, by a long shot, the best version I've ever made. The cookies came out with a cake-like texture and density -- none of the ooey-gooeyness of a chocolate chip cookie. I was pretty disappointed with them at first. I wasn't going to share this recipe, but once I got over them being nothing like my mom's cookies, I decided they were OK(ish).
My recommendation is to go with the original recipe, but just in case you're curious, here's the version I used.

NOT-AS-GOOD-AS-MOM'S CHOCOLATE CHIP COOKIES
Cream:
1/2 cup butter
1/2 cup apple sauce
1/2 cup brown sugar
1/2 cup white sugar
Add:
2 eggs
1 teaspoon vanilla
1 riped mashed banana
1/4 cup (roughly) peanut butter
Mix and add:
1 1/2 cups gluten-free flour (I used a combination of sorghum, brown rice and tapioca)
1/2 cup corn starch
1/2 teaspoon xantham gum
1 teaspoon baking soda
1/2 teaspoon salt
1 cup chocolate chips (a generous cup)
1 cup coconut (this is my substitute for oatmeal, since oatmeal contains gluten)
Grease a jelly roll pan. Spread batter into pan.
Bake in 350 degree oven for 15 minutes.
Let cool for 10-15 minutes (or however long you're patient). Cut into cookie bars.
Sunday, February 26, 2012
Butternut inspiration
I love squash, and tend to buy them if I happen to see them on sale.
That's how I ended up with a butternut squash in my cupboard waiting to be used. I decided to just bake it and eat it plain. But the baked butternut squash just wasn't doing much for me, so I decided to do something different with it.
I found this recipe for Risotto with Butternut Squash and Leeks from Epicurious. I pretty much didn't follow the directions at all (partially because I had already baked my squash, partially because I'm lazy, and partially because I'm not very good at following directions).

My version looked something like this:
LEEK AND BUTTERNUT SQUASH RISOTTO
1 tablespoons olive oil, divided
Slice squash in half. Place in casserole dish or on baking sheet, flesh side down. Bake in 425-degree oven for 45 minutes or until soft.
Cook rice. (I cooked it in my rice cooker. This was a lazy shortcut, rather than following the recipe and adding broth a little at a time, like you should with risotto).


Heat a large pan over medium heat. Add oil. Add garlic, leeks and Italian spices. Saute until leeks are soft. Scoop the squash flesh into the pan and add the rice. Mix well.
Serve with Parmesan cheese.
This ended up a little bland. The recipe calls for fresh basil, which I somehow failed to notice until I sat down to write this blog post. (I told you I wasn't good at following directions). I think that would be a nice addition. Some ground pepper, might also spice it up. I just put some hot sauce on it when I ate, which also worked.
That's how I ended up with a butternut squash in my cupboard waiting to be used. I decided to just bake it and eat it plain. But the baked butternut squash just wasn't doing much for me, so I decided to do something different with it.
I found this recipe for Risotto with Butternut Squash and Leeks from Epicurious. I pretty much didn't follow the directions at all (partially because I had already baked my squash, partially because I'm lazy, and partially because I'm not very good at following directions).

My version looked something like this:
LEEK AND BUTTERNUT SQUASH RISOTTO
1 tablespoons olive oil, divided
1 large butternut squash
3 large leeks, sliced (white and pale green
parts only)
3 cloves garlic
1 tablespoon Italian spices
2 cups brown rice rice
3/4 cup freshly grated Parmesan cheese plus additional (for
serving)
Slice squash in half. Place in casserole dish or on baking sheet, flesh side down. Bake in 425-degree oven for 45 minutes or until soft.
Cook rice. (I cooked it in my rice cooker. This was a lazy shortcut, rather than following the recipe and adding broth a little at a time, like you should with risotto).


Heat a large pan over medium heat. Add oil. Add garlic, leeks and Italian spices. Saute until leeks are soft. Scoop the squash flesh into the pan and add the rice. Mix well.
Serve with Parmesan cheese.
This ended up a little bland. The recipe calls for fresh basil, which I somehow failed to notice until I sat down to write this blog post. (I told you I wasn't good at following directions). I think that would be a nice addition. Some ground pepper, might also spice it up. I just put some hot sauce on it when I ate, which also worked.
Thursday, February 23, 2012
Mmmm...amaranth
.JPG) |
| Amaranth, a delicious gluten-free grain |
Before going gluten free three years ago, I had never heard of amaranth and I had no idea what I was missing out on.
Amaranth is one of the delicious grains I discovered when I cut some of the more common grains out of my diet.
When I first tried it, I cooked it like oatmeal, boiling it with water, until it turned into a porridge. This isn't a bad way to eat it, and I still fix amaranth that way from time to time, but it takes more time than I usually have in the morning.
I came across my preferred way to cook amaranth in the book "Gluten-Free Girl."

BREAKFAST AMARANTH
1/3 cup amaranth
1 banana
cinnamon
milk
Place amaranth in a small frying pan and cook over high heat.

When amaranth starts to pop (much like popcorn), beginning stirring it. Keep cooking over high heat until most of the grains have popped. (This only takes a couple minutes).
 |
| The white specks are the popped amaranth |
Transfer amaranth to a bowl. Slice banana over the top. Sprinkle with cinnamon and add as much milk as desired. (Sometimes I zap it in the microwave for 30 or 45 seconds if the milk cools it down too much).

-------------------------
Although this breakfast recipe does require turning on the stove, it is extremely quick and easy. When I made this batch I put the tea kettle on at the same time as the amaranth. They were both done about the same time.
Instead of banana, you could serve it with apple, pear, raisins or anything else that sounds good.
I buy amaranth in Great Falls at 2J's in the bulk section, which is where I would immagine you'd find it at any health food store. (Although I once looked at Whole Foods in Colorado, and they didn't have any).
The first time I made it this way, I burned the amaranth and was quite bummed because I was afraid it would taste like burnt popcorn, which I hate. It didn't. It didn't really taste burnt at all. It just had a nice toasted flavor. I still try to stir it enough that it doesn't burn, but if it does, don't sweat it.
Tuesday, February 21, 2012
My favorite lentil soup

I stumbled across the recipe while looking for a different soup recipe.
This is one of my mom's recipes. It was a favorite of mine growing up. I requested it so often, that it was pretty much a weekly staple at our house.
I hadn't had this soup in years, but as soon as I saw the recipe I started craving it again, and it's still as good as ever.
I'm not sure where the recipe is from. I have a photo copied version and it clearly came out of some cookbook, and it is actually called "My favorite lentil soup."
MY FAVORITE LENTIL SOUP
2 tablespoons olive oil
2 large or 3 medium onions, chopped
3 carrots, grated
2 teaspoons Italian spices
1 28-ounce can chopped tomatoes with their juice
7 cups broth
1 1/2 cups dried lentils
1/2 teaspoon salt
ground pepper to taste
6 ounces dry white wine (this time I used red because that's what I had)
grated cheddar cheese to taste
Heat oil in large soup pan, add the onions, carrots and spices. Saute for 5 minutes, stirring occasionally.
Add the tomatoes, broth and lentils. Bring soup to a boil, reduce heat, cover and simmer for about 1 hour or until the lentils are tender.
Add salt, pepper and wine. Simmer soup for a few minutes.
Blend with a stick blender. (The recipe says to leave it chunky, but I like it blended).
Serve with cheese sprinkled on each portion.
What to bring for brunch?
My hockey team does this fun thing where we all bring brunch items for games and tournaments so that we can hangout after the game (and sometimes before) with the other team, munch on some good food and enjoy each other's company.
For our last brunch, I brought rhubarb coffee cake (a favorite recipe that I'll be sure to share soon). Last weekend I racked by brain trying to think of something to bring that was a., tasty, b., easy to eat while standing around chit-chatting, and c., easy to transport and serve.
I was leaning toward some kind of egg dish in a crock pot, when I found this recipe from Pillsbury.
Here's how I made it:
OVERNIGHT BANANA FRENCH TOAST
For our last brunch, I brought rhubarb coffee cake (a favorite recipe that I'll be sure to share soon). Last weekend I racked by brain trying to think of something to bring that was a., tasty, b., easy to eat while standing around chit-chatting, and c., easy to transport and serve.
I was leaning toward some kind of egg dish in a crock pot, when I found this recipe from Pillsbury.
 |
Pillsbury photo
|
OVERNIGHT BANANA FRENCH TOAST
1 loaf gluten-free bread, cut into 1/2-inch cubes (I used a mixture of Udi's whole grain and Food for Life's rice almond bread)
8 eggs
1 cup milk
1 cup maple syrup (I used the fake stuff)
4 bananas, sliced
Spray a 13-by-9-inch baking dish with cooking spray.
Arrange bread cubes in baking dish.
In large bowl, beat eggs, milk and 1/2 cup of the maple syrup with wire whisk. Pour over bread in baking dish. Cover and refrigerate 8 hours or overnight.
Heat oven to 350°F. Uncover; bake 35 to 40 minutes or until golden brown along edges. Let stand 7 to 10 minutes before serving.
Slice bananas over the baked dish. Generously drizzle the remaining maple syrup over the bananas. Serve immediately.
Caramel corn
 |
Epicurious photo
|
Last week I was having a multi-day hankering for a caramel corn.
I finally caved and used book club as an excuse to make some.
I did a quick search on Epicurious and found this recipe.
Here is my tweaked version (which I also cut in half from the original recipe):
CARAMEL CORN WITH ALMONDS
Nonstick vegetable-oil spray
1/2 cup popcorn kernels
1 tablespoon canola oil
1 teaspoons coarse kosher salt
1/4 cup light corn syrup
1 1/3 cups sugar
1/2 tablespoon baking soda
4 tablespoons (1/2 stick) unsalted butter, cut into small
pieces
1 cup almonds
Pop popcorn with oil and salt. (I have a handy microwave popper that I love). Spray a large bowl and spatula with Pam. Pour popcorn into prepared bowl.
In a large deep pot over moderately high heat, combine the
corn syrup, sugar, and a splash of water. Stir to combine.
Cook, undisturbed,
until the mixture develops a light amber color, about 10 minutes. (Don't stir the mixture because this can cause it to harden, but it is OK to swirl it in order to evenly distribute the color - a new tip I learned thanks to Epicurious).
Remove the pot
from the heat, add the baking soda and butter, and stir continuously to melt the
butter and combine the ingredients, about 20 seconds.
Working very quickly (I did not do this quickly enough), pour the caramel over the popcorn and add the
almonds, then use the prepared spoon or rubber spatula to stir everything
together, trying to evenly coat the popcorn and nuts in caramel.
Transfer to the
prepared baking sheet, spreading out the caramel corn as much as possible.
Let cool and harden for about 20 minutes. Break
the caramel corn into smaller, bite-size pieces and serve.
-------------
I realized after it was too late that my mixing bowl was not big enough. When I poured the caramel on the popcorn and tried to stir it, popcorn ended up all over my table and the caramel stayed in a big lump in the middle.
I liked the recipe, but I need to refine my technique. The caramel kind of reminded me of brittle (as in peanut brittle). I didn't exactly quell my caramel corn craving.
After book club, I brought the leftovers to work. My friend Jackie (who happens to be the Food page editor) suggested this recipe for the next time I'm craving caramel corn:
KILLER CARAMEL CORN
2 bags microwave popcorn, popped
10 large marshmallows
10 tbsp. brown sugar
10 tbsp. butter
1/2 tsp. baking soda
In microwave-safe bowl, combine marshmallows, sugar and butter. Nuke on high 60 to 90 seconds until marshmallows melt. Stir. Add baking soda and nuke 45 seconds more.
Pour over popcorn and stir to combine.
Be careful. It is molten and will burn. Spread on waxed paper to cool.
Subscribe to:
Posts (Atom)